

Wish to construct a slide presentation for a gathering, coaching, or different tournament? Google Slides is an easy-to-use internet app that includes the very important gear and extra. It shops your displays within the cloud with Google Power. Somebody with a Google account can use Slides and Power free of charge, and so they’re additionally incorporated with a Google Workspace (previously G Suite) subscription for trade and endeavor consumers. There are Google Sheets cellular apps for Android and iOS, too.
This information will lend a hand you familiarize yourself with the Google Slides internet interface and display you easy methods to get started a brand new presentation, add a Microsoft PowerPoint report to edit in Google Slides, collaborate with others to your presentation, and after all, provide it to others.
Create or open a presentation
Log in for your Google or Workspace account. Then:
From Google Slides: On the best of the house web page, you’ll see a “Get started a brand new presentation” header, with a row of thumbnails beneath. To begin a brand new, clean presentation, click on the Clean thumbnail. To begin a brand new presentation in a template, make a selection one of the vital thumbnails to the best or click on Template gallery towards the upper-right nook, then click on any thumbnail at the web page that looks.
 IDG
IDGThe Google Slides house web page. (Click on symbol to magnify it.)
Beneath the “Get started a brand new presentation” space you’ll see an inventory of displays which can be saved for your Google Power or shared with you. To open a presentation, click on it on this listing.
The listing of your displays seems in opposite chronological order beginning with the presentation you maximum lately opened. Clicking the “AZ” icon on the higher correct of this listing adjustments the kind order to Remaining changed through me, Remaining changed, or in alphabetical order through presentation name. You’ll additionally browse to a selected folder through clicking the folder icon subsequent to the “AZ” icon.
From Google Drive: Shows saved for your Google Power are indexed in the primary window of the Power house web page. To look an inventory of displays that others are sharing with you, click on Shared with me within the left column. From both listing, double-click a presentation to open it in Google Slides.
To begin a brand new, clean presentation, click on the New button on the upper-left of the display after which click on Google Slides.
If you wish to use a template to begin a brand new presentation, click on the New button, then transfer the cursor over the best arrow subsequent to Google Slides and make a selection From a template. The template gallery for Google Slides will open; click on a thumbnail to begin a brand new presentation in that template.
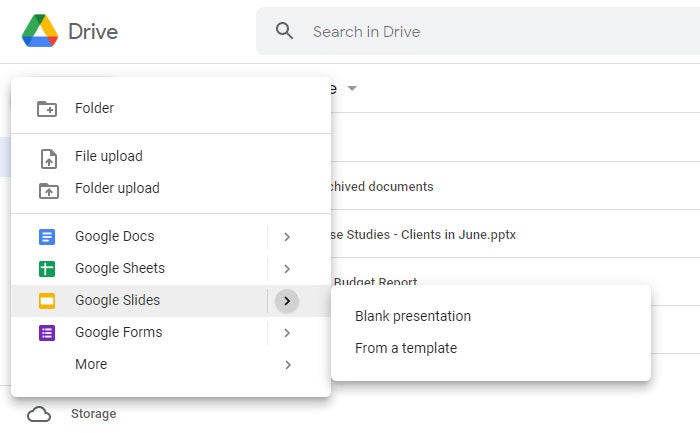 IDG
IDGDeveloping a brand new presentation from Google Power.
From Google Slides or Power: You can also use the quest field on the best to search out displays for your Google Power or shared with you. Input phrases or numbers that can be within the presentation you might be on the lookout for.
Add a PowerPoint presentation to Slides
You’ll edit a Microsoft PowerPoint presentation in Google Slides, however first you should add it to Google Power.
From Google Slides: Click on the folder icon (Open report picker) that is above and towards the best nook of your displays listing. At the panel that opens, click on the Add tab. Drag-and-drop your PowerPoint report (.ppt or .pptx) onto this panel, or browse your PC’s pressure to make a choice it.
From Google Power: Click on the New button, then Document add, and make a selection the PowerPoint report out of your PC’s pressure and click on Open.
Historically, while you uploaded PowerPoint information to Google Power, they had been robotically transformed to Slides layout. That’s nonetheless the case while you add PowerPoint information by way of the Google Slides house web page.
Then again, Google now helps the power to edit Microsoft Place of job information of their local layout. By way of default, any .pptx information that you just add by way of Google Power will stay formatted as PowerPoint paperwork. You’ll edit and collaborate on a PowerPoint report correct in Slides, with all adjustments made through you or your collaborators stored immediately to the PowerPoint report.
At the Google Slides and Power house pages, local PowerPoint information might be denoted with an orange “P” icon, and while you open a local PowerPoint report in Sheets, you’ll see a “.PPTX” flag to the best of the file name.
 IDG
IDGLocal PowerPoint information display the PowerPoint icon (best) as an alternative of the Google Slides icon (backside).
For those who’d slightly have Google convert PowerPoint information to Slides layout robotically while you add them by way of Google Power, click on the equipment icon within the upper-right nook of the Power house display and make a selection Settings from the drop-down menu. Within the Settings field subsequent to “Convert uploads,” take a look at the checkbox marked Convert uploaded information to Google Doctors editor layout.
Paintings in a presentation
While you open a brand new or present presentation, its first slide seems in the primary window of Google Slides. Right here’s a breakdown of the toolbars, menus, panes, and sidebars that seem round your presentation.
The left pane displays thumbnails of all of the slides for your presentation. Click on a thumbnail, and the slide it represents will seem in the primary window, the place you’ll edit it.
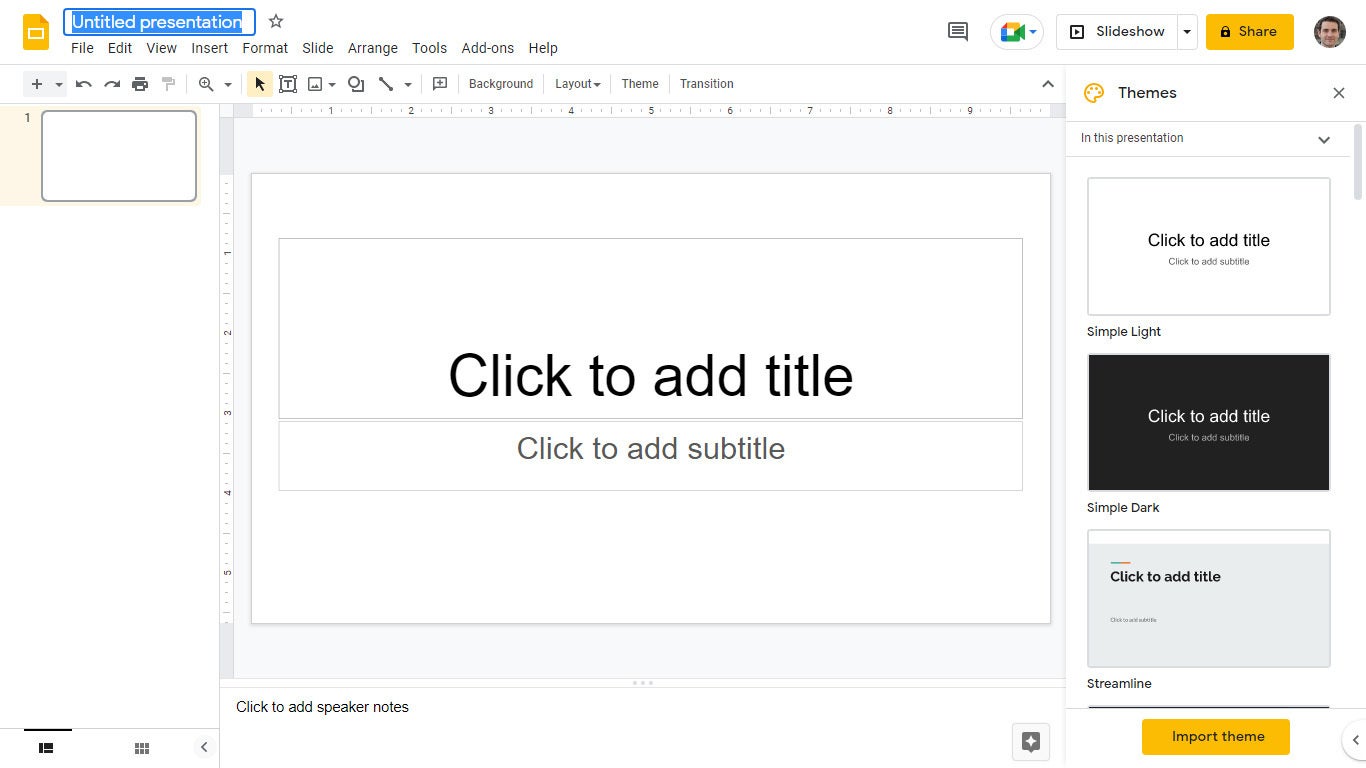 IDG
IDGThe Google Slides enhancing interface. (Click on symbol to magnify it.)
Your presentation’s name seems alongside the highest of the display. To modify it, click on any place throughout the name and get started typing.
The menu bar underneath your presentation’s name has an entire set of gear for running with displays. Those are the primary submenus to understand:
- Document has instructions for taking motion at the complete presentation, together with Print, Rename, and Percentage.
- Edit lists the usual enhancing instructions reminiscent of reproduction, reduce, paste, delete, reproduction, and to find and exchange.
- View lists a number of ways in which you’ll view your slides as you design and edit them. This comprises arranging them right into a grid, previewing them as a slideshow, or zooming in on them. You’ll additionally watch the transition impact that takes position between slides once they’re performed in a slideshow.
- Insert allows you to upload a number of gadgets for your slides, together with charts, diagrams, photos, tables, and textual content. You’ll additionally upload hyperlinks to YouTube movies or sound or video information which can be saved for your Google Power.
- Layout allows you to exchange the glance of your slides. Positive purposes in this submenu develop into clickable relying on whether or not you’ve decided on a picture or textual content on a slide, or decided on the slide itself.
- Slide is the place you’ll upload, delete, or reproduction a slide that you just’ve decided on. You’ll additionally upload a preset format to a slide, exchange its background or theme colour, or upload and edit a transition impact that takes position between slides when your presentation is performed as a slideshow.
- Organize lists gear that allow you to workforce or reorder gadgets on a slide relating to every other. As an example, you’ll position a picture in the back of every other symbol or workforce a picture and a block of textual content in combination to lead them to more uncomplicated to transport directly.
- Gear results in a number of miscellaneous purposes. Those come with letting you document a voice clip to move with a slide, operating a spell checker, and appearing you an inventory of gadgets for your presentation which can be related to different information.
The toolbar immediately above your presentation places frequently used instructions in clean succeed in. From this toolbar, you’ll click on buttons so as to add to a slide or exchange its background, feedback, format, gadgets (pictures, traces, shapes, textual content), textual content taste, theme colours for the entire presentation, transition results all the way through a slideshow, and extra. The buttons at the toolbar exchange relying on whether or not you’ve decided on symbol or textual content on a slide or the slide itself.
Realize that there’s no Save button within the toolbar — or any place in Google Slides. That’s as a result of Slides robotically saves any adjustments you are making for your presentation.
Speaker notes: Alongside the ground of every slide you’ll see a space marked Click on so as to add speaker notes. Right here you’ll sort briefly notes to remind your self what to do or say when the slide is being proven. Best you are going to see those notes while you display your presentation to an target audience.
Subject matters sidebar: While you get started a brand new clean presentation, the Subject matters sidebar opens at the correct facet of the display. (You’ll additionally open this sidebar at any time through clicking Theme at the toolbar above your presentation.) Subject matters practice the similar fonts, colours, and different design components to all of the slides in a presentation, giving it a constant feel and look. Click on a thumbnail on this sidebar to modify your presentation to that theme.
Create and organize slides
Listed here are the fundamental issues to find out about running with slides in a presentation.
Upload a brand new, clean slide for your presentation: Click on the + button on the left finish of the toolbar above your presentation. However, when you click on the down arrow subsequent to the +, you’ll select a format to make use of as the foundation for a brand new slide.
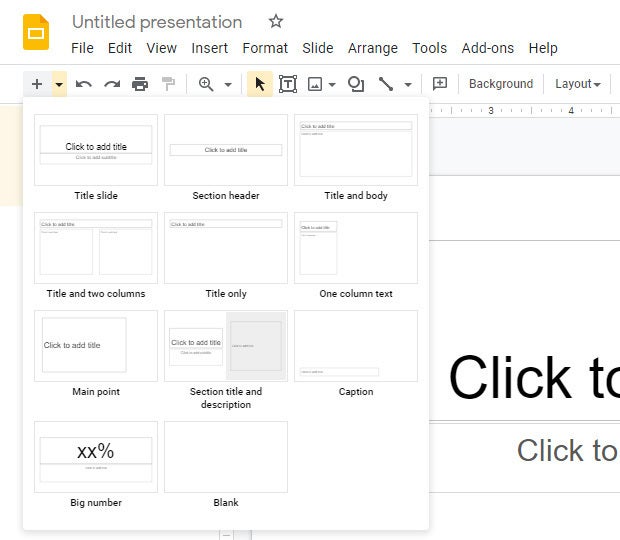 IDG
IDGClick on the down arrow subsequent to the + button within the toolbar to make a choice a format for a brand new slide.
Follow or exchange a slide’s background: Make a selection the slide’s thumbnail within the left sidebar and click on Background at the toolbar above your presentation. At the panel that opens, you’ll exchange the slide’s background colour or use a picture report out of your Google Power, Google Pictures account, or PC because the background.
Follow or exchange a slide’s format: Make a selection the slide’s thumbnail within the left pane, then click on Structure at the toolbar above your presentation. At the panel that opens, make a selection the format you need to use to this slide.
Follow or exchange a slide’s transition: Make a selection the slide’s thumbnail within the left sidebar and click on Transition at the toolbar above your presentation. Within the Movement sidebar that opens alongside the best facet of the display, you’ll practice or exchange the animated transition impact this is performed earlier than this slide.
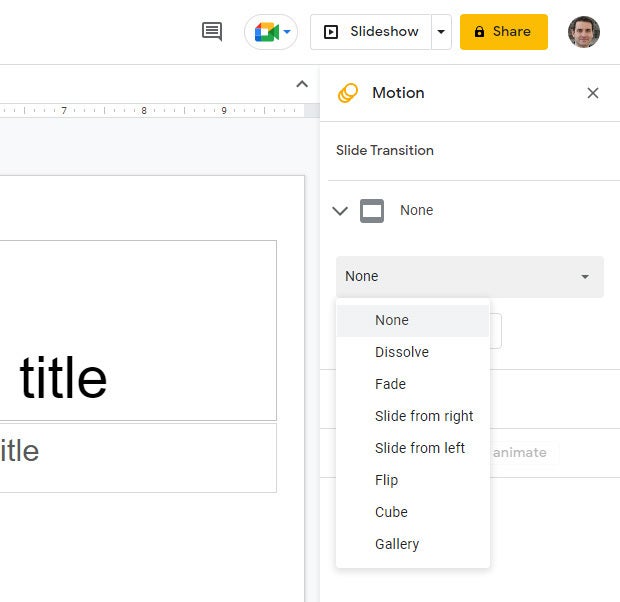 IDG
IDGOpting for a transition taste within the Movement pane.
Transfer a slide to another spot within the slideshow series: Click on and dangle its thumbnail within the left sidebar, drag it up or all the way down to every other position within the series, and free up it.
Delete a slide: Proper-click its thumbnail within the left sidebar and make a selection Delete from the pop-up menu. However, make a selection its thumbnail and make a selection Edit > Delete from the menu bar or simply press the Delete key.
Percentage and collaborate on a presentation
Shows are frequently a gaggle effort, with a number of staff participants contributing to and sharpening a presentation. In Slides, it’s clean for more than one collaborators to paintings on a presentation in combination.
First, you want to proportion the presentation. While you’re viewing your presentation in Google Slides, click on the Percentage button on the upper-right. Or, out of your Google Power homepage, click on to focus on the presentation that you need to proportion. Then, within the toolbar towards the higher correct, click on the Percentage icon (a head-and-shoulders silhouette with a +).
Both method, the “Percentage” panel will open.
 IDG
IDGAtmosphere permissions for a report being shared privately.
Percentage a presentation privately
Within the access field, input the e-mail addresses (or names of your Google Contacts) of the folks with whom you need to proportion. By way of default, the folks you invite for your presentation can edit it and reshare it with others.
To modify get right of entry to permissions for invitees: Click on Editor to the best of the access field and select an alternative choice from the drop-down menu. Commenter manner they may be able to view your spreadsheet and upload feedback however can’t exchange it. Viewer manner they may be able to view your presentation however can’t edit it or upload feedback.
To stop your presentation from being reshared, downloaded, or published: Click on the equipment icon on the upper-right of this panel. At the smaller panel that opens, uncheck the containers through Editors can exchange permissions and proportion and Audience and commenters can see the way to obtain, print, and duplicate.
While you’re performed atmosphere permissions (and, optionally, typing in a message for your invitees), click on Ship, and everybody you’ve added will obtain an e mail with a hyperlink they may be able to click on to get right of entry to the file.
The shared presentation icon.
A presentation you’ve shared (or that others have shared with you) may have an icon of 2 silhouetted heads subsequent to it within the displays listing to your Google Sheets and Google Power house pages.
To restrict or exchange an individual’s get right of entry to for your presentation: With the presentation open in Google Slides, click on the Percentage button on the upper-right. Or, from Google Power, spotlight the presentation and click on the Percentage icon.
The Percentage panel reopens appearing an inventory of all of the other people you’ve invited, together with their permission standing. Click on the down arrow to the best of an individual’s title, exchange their permission stage or take away their get right of entry to fully, and click on Save.
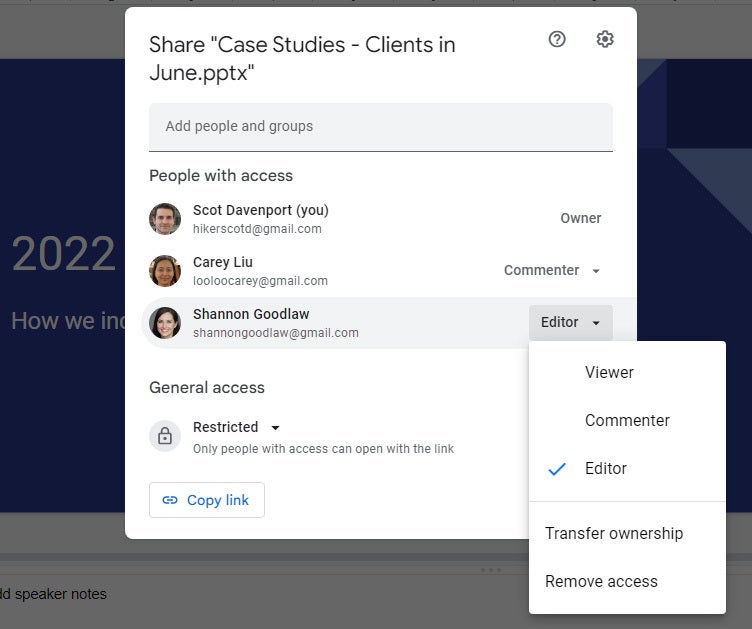 IDG
IDGYou’ll exchange permissions for other people you’ve shared a presentation with on a person foundation.
When you’ve got a Google Workspace subscription, an alternative choice is to make a choice Give brief get right of entry to and, subsequent to Get admission to expires, make a selection a date inside 12 months of the present date. For those who set an expiration date for an individual that you just’ve assigned as Editor, their get right of entry to might be downgraded to Commenter at the expiration date.
Percentage a presentation publicly
Maximum trade customers will need to proportion displays privately with make a selection colleagues or shoppers, however you do find a way to proportion a presentation publicly. On the backside of the Percentage panel is a “Basic get right of entry to” space the place you’ll reproduction a hyperlink to the file. By way of default, this hyperlink is particular to these you invite to the file. To modify it to a public hyperlink, click on Limited and make a selection Somebody with the hyperlink from the menu that looks.
Click on Replica hyperlink and the hyperlink for your presentation might be copied for your PC’s clipboard. You’ll proportion this hyperlink through pasting it into a talk message, file, e mail, discussion board submit, or maximum different manner of on-line written communique. Somebody who clicks this hyperlink will be capable of view your presentation on-line. (Bear in mind that any one can reproduction and reshare this hyperlink.)
To permit any person within the public to touch upon or edit your presentation: On the backside correct of the Percentage panel, click on Viewer and make a selection Commenter or Editor from the drop-down menu. Then click on the Achieved button. Now the internet hyperlink for your presentation will let any person who clicks it upload a remark or edit it.
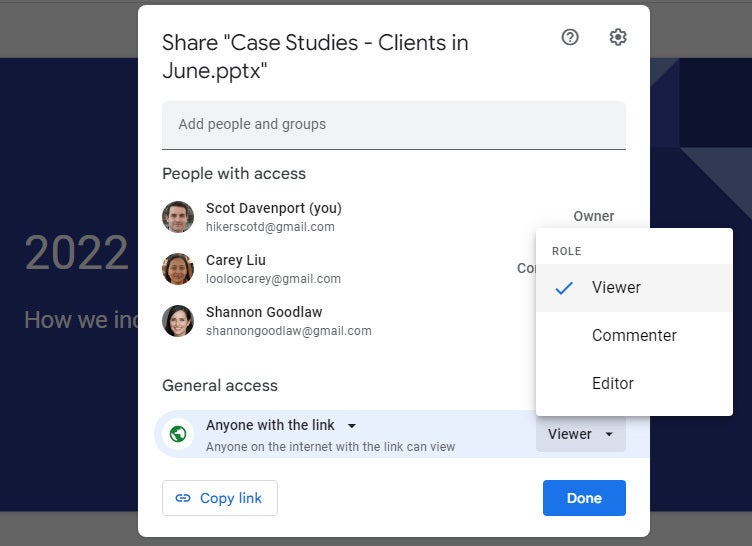 IDG
IDGSharing a spreadsheet publicly.
To show off public sharing on your presentation: Deliver up the Percentage panel once more. Close to the ground, click on Somebody with the hyperlink and make a selection Limited from the menu, then click on the Achieved button.
Be aware: You’ll practice each private and non-private sharing the way to your presentation. As an example, you have to permit the general public to just view your presentation, however permit particular other people that you just’ve invited to touch upon or edit it.
Collaborate on a presentation
The folks you’ve shared a spreadsheet with can view or paintings on it concurrently you or at different occasions. Needless to say individuals who have Editor privileges for your presentation can exchange all facets of it. Having more than one other people making adjustments to a presentation can get complicated. Generally, atmosphere everybody to Commenter is the easiest way to collaborate in Slides: Other people can connect feedback to a slide or to things in a slide, however their feedback received’t adjust your presentation’s data or design.
So as to add a remark to a slide: Proper-click its thumbnail within the left sidebar and make a selection Remark from the menu that opens. However, you’ll make a selection its thumbnail and make a selection Insert > Remark from the menu bar or click on the Upload remark button (a speech balloon with a + signal).
A clean remark card along with your title on it opens to the best of the slide in the primary window. In this card’s access line, sort a short lived remark, and while you’re completed, click on the Remark button.
 IDG
IDGTyping in a brand new remark.
So as to add a remark to an object on a slide: Proper-click the thing (a block of textual content, chart, symbol, image, and so forth.) and make a selection Remark from the menu that opens. However, you’ll make a selection the thing and make a selection Insert > Remark from the menu bar.
To attract somebody’s consideration to a remark: As you’re composing the remark, sort the @ image and start typing their title, then make a selection the individual from the listing of advised Google contacts that looks. They’ll obtain an e mail notifying them of the remark and linking to it.
To learn, respond to, or take away a remark: A slide that incorporates a remark is denoted within the left sidebar with a speech balloon through its thumbnail. Click on the slide’s thumbnail to make the slide seem in the primary window, and also you’ll see all its remark playing cards at the correct.
To answer a remark, click on its card. The cardboard will enlarge to show an access line the place you’ll upload a remark in reaction.
 IDG
IDGReplying to a remark.
Clicking the checkmark on the higher correct marks the remark card as “resolved” and gets rid of the cardboard from the presentation. Clicking the cardboard’s three-dot icon opens a menu that allows you to edit or delete your remark.
To look an inventory of all feedback: Click on the Open remark historical past icon (the speech balloon) to the left of the Slideshow button. A sidebar will open alongside the best facet of the display; it lists all of the remark playing cards for your presentation. While you click on a remark in this listing, the view of your presentation in the primary window will soar to the cellular the place the remark is positioned and open its remark card.
 IDG
IDGThe Feedback pane allows you to temporarily assessment all feedback and soar to precise ones.
For extra information about participating to your presentation, together with what it’s love to collaborate in actual time, see “How to collaborate on a document” in our Google Power information. You’ll additionally collaborate on a presentation in Google Chat; that’s lined later on this tale.