

It’s regularly a lot more straightforward to put across knowledge with a well-designed diagram than to be in contact thru a big textual content blurb. Because the previous pronouncing is going, “an image is value one thousand phrases.”
That’s the place Microsoft Visio is available in. A part of the Microsoft 365 suite, this app is helping execs put across knowledge thru professionally designed diagrams.
What’s Microsoft Visio?
Microsoft Visio is the diagramming and vector graphics utility within the Microsoft Administrative center circle of relatives. If you want to make diagrams equivalent to determination bushes, float charts, org charts, and so forth, that is the Microsoft instrument to do it. Visio is much less widespread than different Microsoft apps like Phrase or Excel, however it’s nonetheless a treasured instrument to know and use in on a regular basis trade.
Even supposing there’s a desktop Visio utility, this cheat sheet will stroll you in the course of the fundamentals of the use of Visio in Microsoft 365 — the web-only model that’s incorporated with Microsoft 365/Administrative center 365 trade and endeavor subscriptions — since maximum trade execs who use Administrative center have get right of entry to to this model. All the options within the information superhighway model of Visio may also be discovered within the desktop utility, however not vice versa.
The right way to in finding Microsoft Visio inside of Microsoft 365
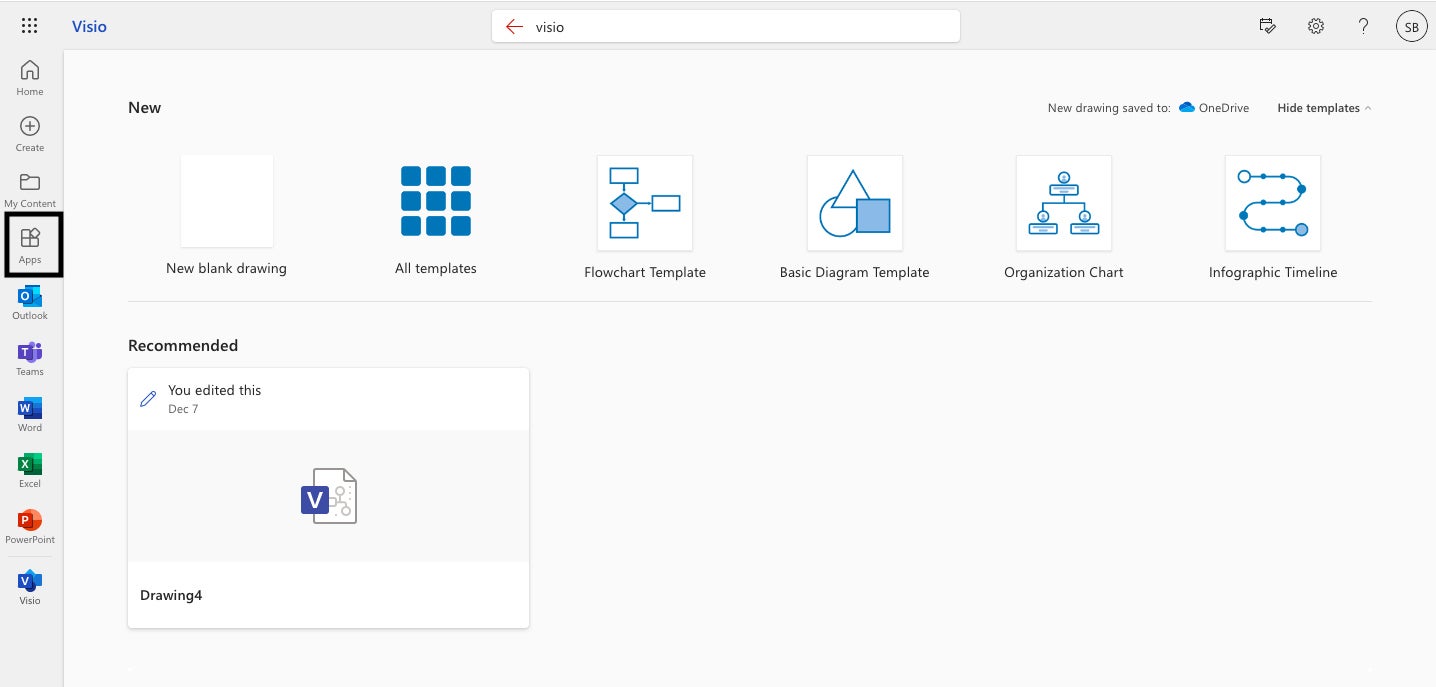
To start out this instructional, we wish to find and open Microsoft Visio. For most of the people, Visio is probably not a default utility in your Microsoft 365 house web page (previously referred to as the Administrative center house web page). To seek out Visio, navigate your Microsoft 365 home page, check in in case you haven’t already, and sort visio within the seek bar on the best of the display screen.
 Shimon Brathwaite/IDG
From the Microsoft 365 house web page, seek for Visio and release it to your browser. (Click on symbol to magnify it.)
Click on Visio within the effects listing to release the information superhighway app to your browser. You are going to be taken to a web page the place you’ll be able to see some recurrently used templates for growing diagrams. This contains flowcharts, elementary diagrams, organizational charts, and infographic timelines. There could also be an icon labelled “All templates” — right here you’ll be able to undergo your entire listing of templates to be had in Visio that can assist you in finding the precise template this is proper in your scenario.
 Shimon Brathwaite/IDG
The Visio get started web page has plenty of templates to start out from. (Click on symbol to magnify it.)
The use of templates is the best way to start making diagrams in Visio. I’ll stroll you thru two of the most typical Microsoft Visio use instances — growing flowcharts and org charts. If Visio doesn’t have a template that fits what you are promoting wishes, it’s fast and simple to make customized diagrams the use of Visio’s drag-and-drop options; I’ll display you that procedure as properly.
The right way to create a flowchart in Microsoft Visio
A flowchart is a kind of diagram that represents a workflow or procedure. It is superb for appearing the step by step procedure for finishing a job whilst supplying you with the versatility to turn other selections that wish to be made and representing if-then eventualities. Microsoft Visio makes it extraordinarily simple to create this sort of diagram.
On this instance, we will be able to create a easy float diagram to turn what’s going to occur all over a group assembly to talk about a brand new thought for an organization app. The group will speak about the theory, come to a decision in the event that they adore it, after which take motion in response to that call prior to finishing the assembly.
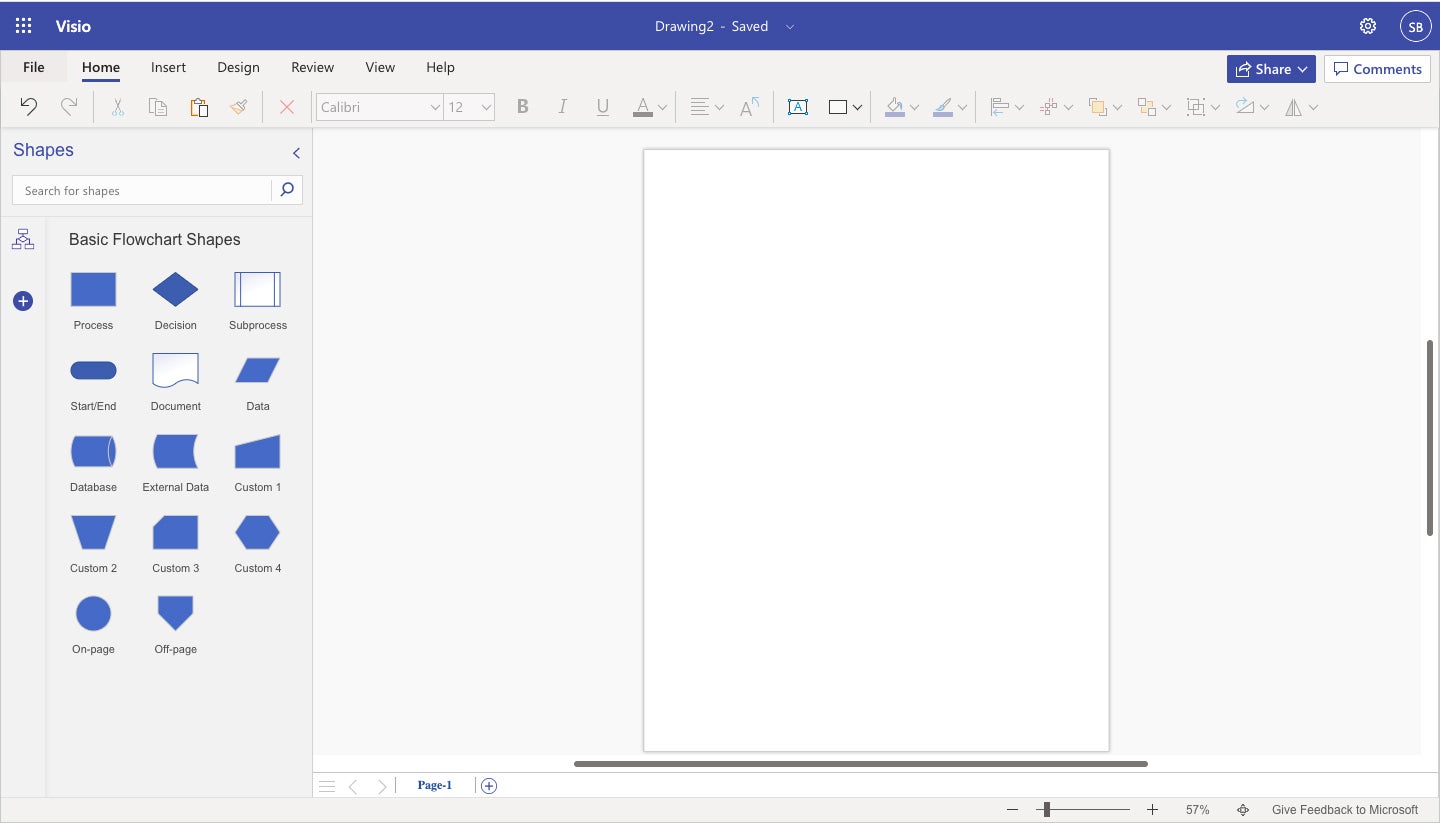
Start via clicking the Flowchart Template icon at the Visio get started web page. You’ll be taken to the principle Visio interface, which seems so much like Microsoft Phrase and different Microsoft 365 apps.
 Shimon Brathwaite/IDG
The flowchart template opens with elementary flowchart shapes within the left column and a clean canvas at the proper, crowned via the Administrative center Ribbon toolbar. (Click on symbol to magnify it.)
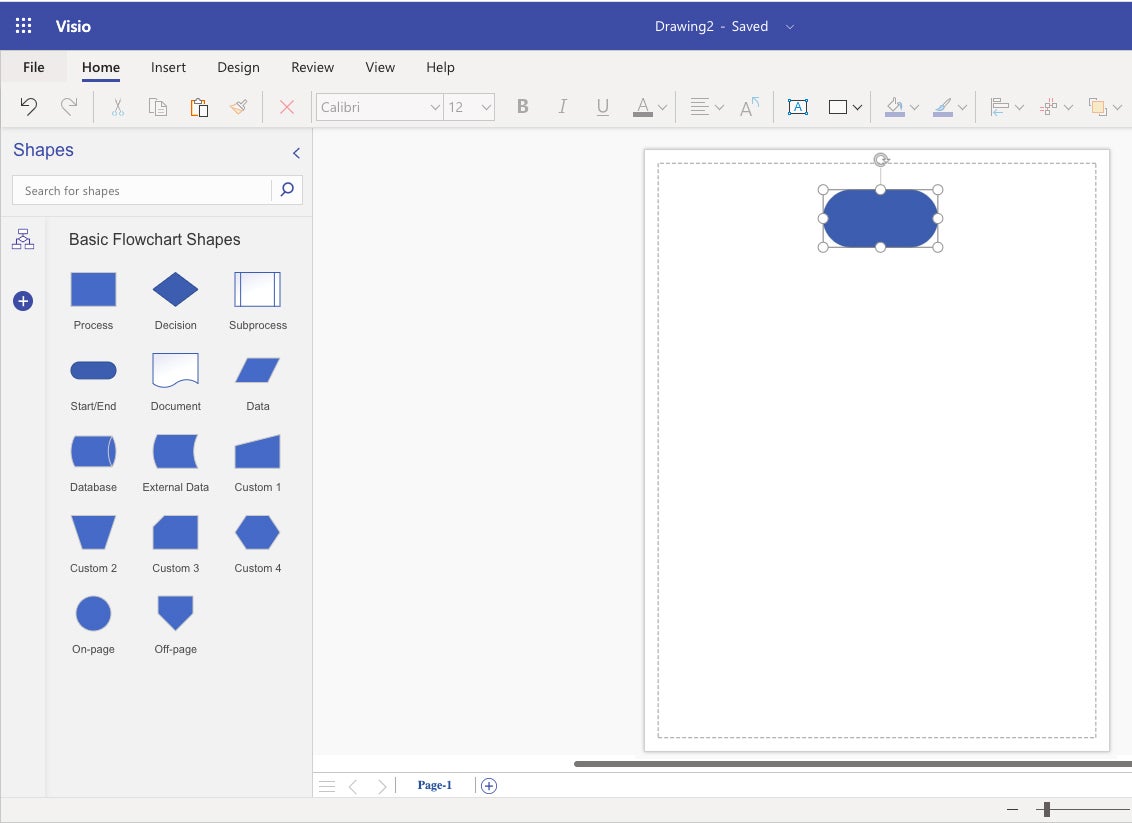
Step one for any flowchart is making a get started level. Click on and grasp the oval Get started/Finish icon within the left panel and drag it onto the clean canvas house at the proper. The oval object seems with 8 “take care of” issues on the corners and facets. To resize the oval, click on and drag any of those handles; to transport the oval at the canvas, click on the center of the oval and drag it.
 Shimon Brathwaite/IDG
Drag a Get started/Finish oval onto the canvas. Drag any of the “handles” across the outdoor of the oval to resize it. (Click on symbol to magnify it.)
So as to add textual content to a picture, click on within the middle of it, and also you’ll input textual content edit mode — simply kind within the textual content you wish to have to look there. In our instance, we’ll name the beginning oval form “Workforce Assembly Starts.” You’ll modify the textual content’s font and dimension the use of the gear within the Ribbon toolbar on the best of the display screen.
 Shimon Brathwaite/IDG
The beginning oval now presentations “Workforce Assembly Starts.” (Click on symbol to magnify it.)
Subsequent, you want so as to add your processes — each step that can be taken for the duty to be finished that doesn’t require a choice to be made. Those are represented via rectangles.
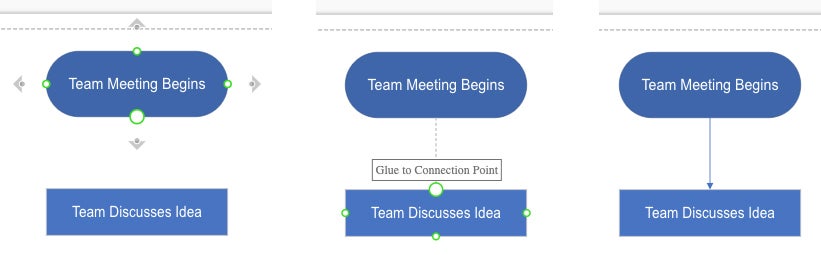
Click on the Procedure icon and drag it to the canvas under the oval we added in the past. As you accomplish that, a dotted inexperienced line seems that guides you to put the rectangle immediately under the oval. Resize the rectangle as wanted, then title it “Workforce Discusses Thought.”
To glue the pieces, merely hover over the ground fringe of the beginning symbol, then click on and drag from the golf green and white button at the get started symbol to the highest of the method symbol. This may increasingly create a downward-flowing arrow connecting the 2.
 Shimon Brathwaite/IDG
Connecting the method rectangle to the beginning oval. (Click on symbol to magnify it.)
If you are making a mistake, you’ll be able to delete any form or line at the canvas via proper clicking-it and settling on Delete from the pop-up menu.
Subsequent, in our flowchart, we’ll display that the group must come to a decision whether or not they just like the app thought. That is represented by the use of a diamond symbol and could have 3 conceivable results.
Click on the Choice icon within the left panel, drag it under “Workforce Discusses Thought,” and repeat the stairs defined above to resize it, title it, and fasten it as proven under.
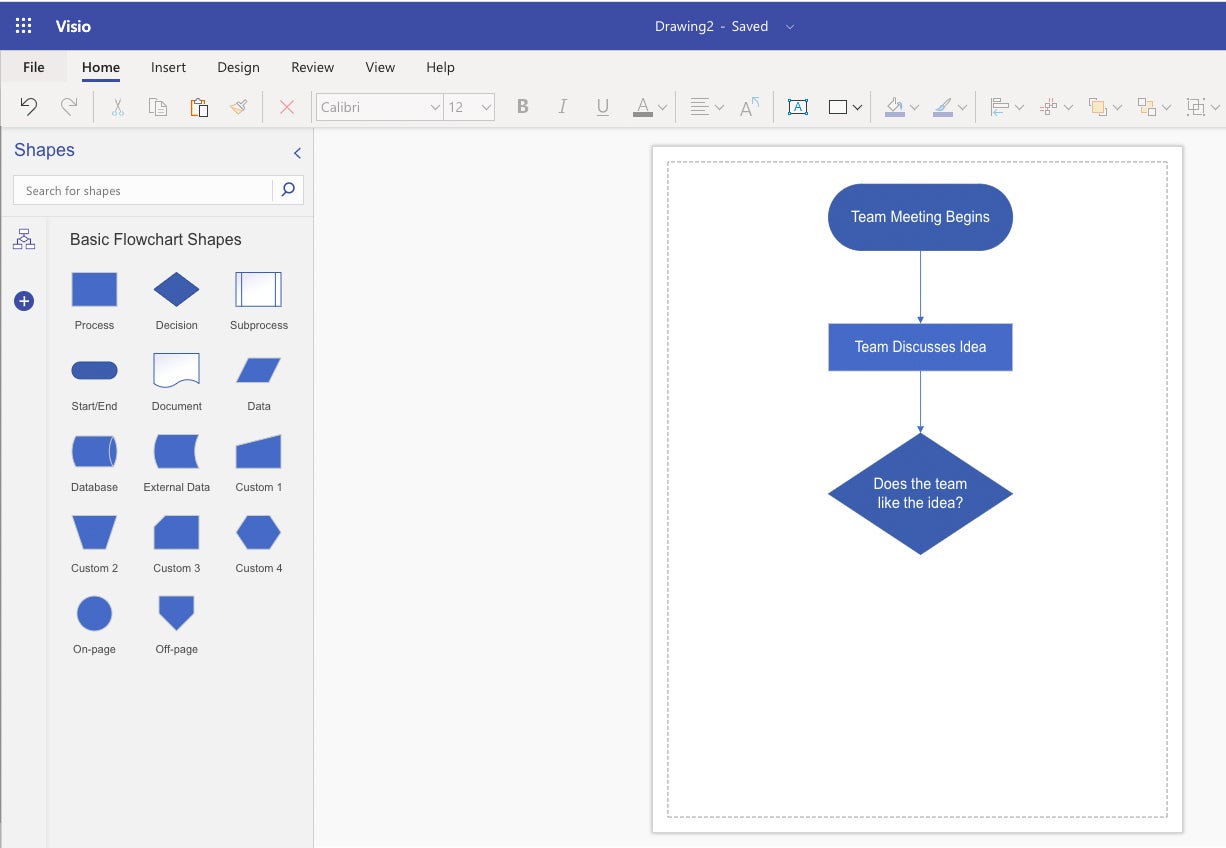 Shimon Brathwaite/IDG
Upload the verdict diamond and fasten it to the method rectangle above. (Click on symbol to magnify it.)
The 3 conceivable responses to the verdict can be “No,” “Sure,” and “No longer Sufficient Information.”
So as to add textual content containers for the responses, move to the House tab at the Ribbon and make a choice the Textual content Field icon (a sq. with an A within the center). Click on on that and your cursor will be capable of draw textual content containers at the canvas. Create a textual content field for every reaction, then kind the proper phrase or word in every one. You’ll paintings with textual content containers in the similar tactics you’ll be able to with shapes.
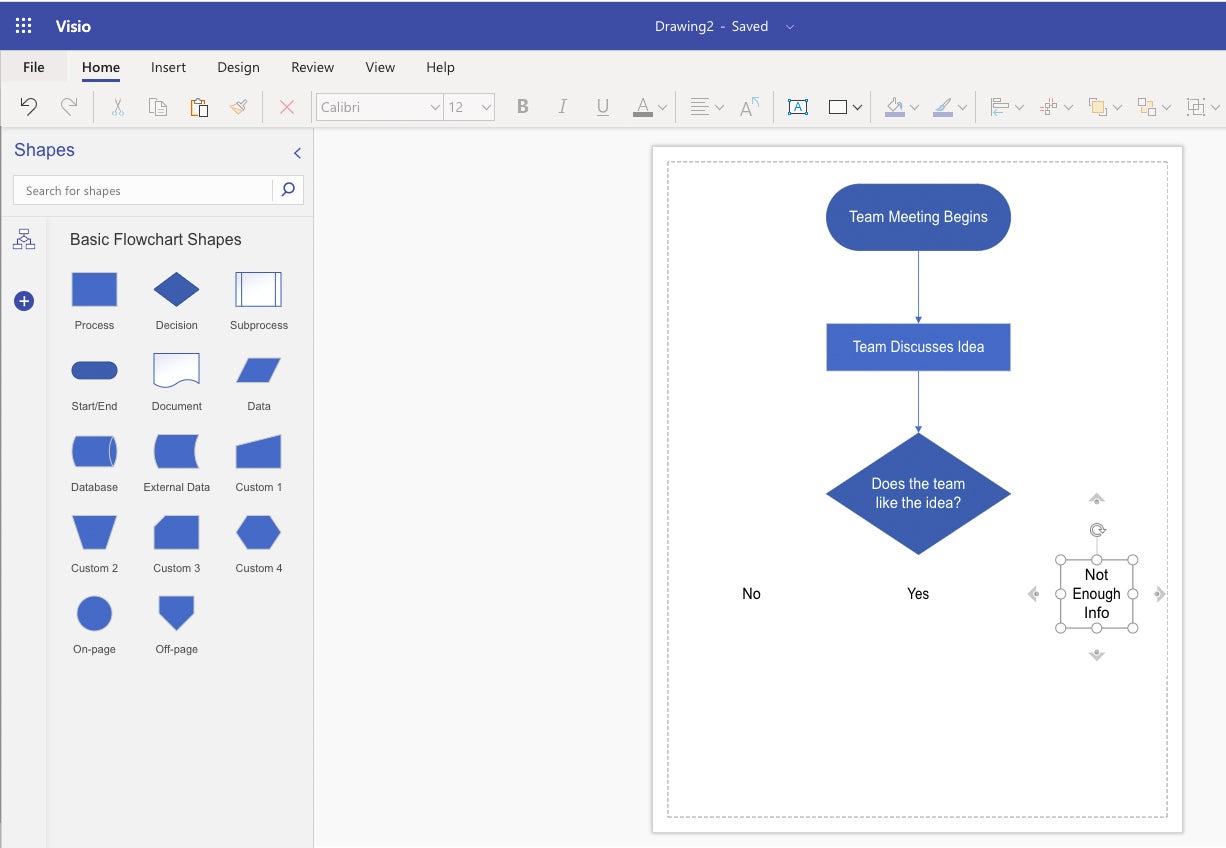 Shimon Brathwaite/IDG
Including textual content containers for the 3 conceivable responses. (Click on symbol to magnify it.)
Under every textual content field, upload an oblong Procedure form for its consequence and title the result shapes as proven under. Draw connector traces from the Choice form to every reaction and from every reaction to its consequence. To create connector traces that move throughout after which down the canvas, merely drag from the beginning object out to the facet after which down, and the connector line will seem the place you dragged.
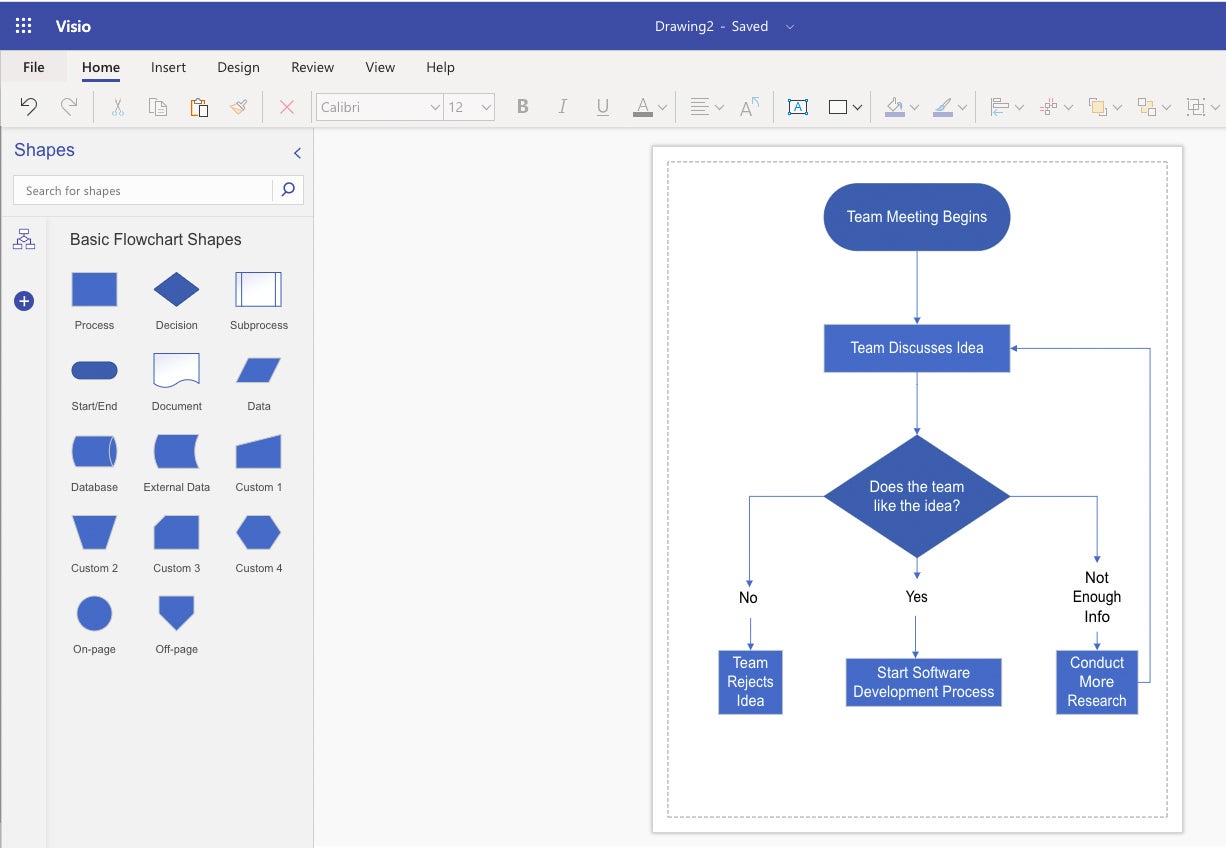 Shimon Brathwaite/IDG
Including and connecting the 3 results. (Click on symbol to magnify it.)
Now we’ve added 3 conceivable results to our determination tree that may duvet the conceivable results of the assembly. Please be mindful of the 3rd determination (furthest to the precise). Continuously you could wish to account for selections that may lead to you going again to an previous step within the procedure and redoing some steps. (Having the 3rd possibility go back to a prior step on this instance is for demonstration functions; in fact, you’d behavior extra analysis outdoor the assembly after which speak about the theory once more in a later assembly.)
Now there is just one step left: upload the finishing to the flowchart (the use of the Get started/Finish form once more), which is when the assembly ends.
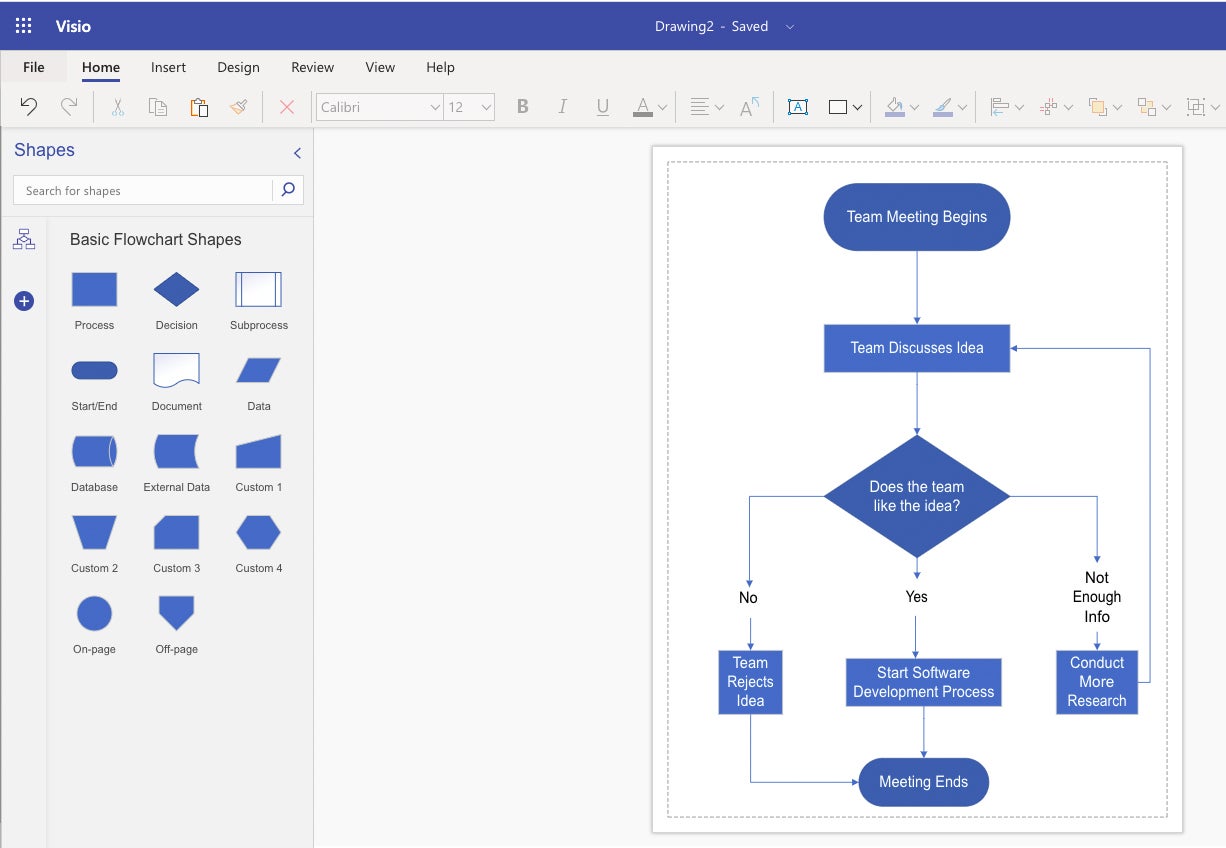 Shimon Brathwaite/IDG
Upload, label, and fasten the top form, and the flowchart is whole. (Click on symbol to magnify it.)
The right way to create a company chart in Microsoft Visio
Subsequent, we will be able to have a look at how one can create a easy org chart that is composed of 1 head govt, their assistant, two managers, and their corresponding groups. Return to the Visio get started web page and click on at the Group Chart template.
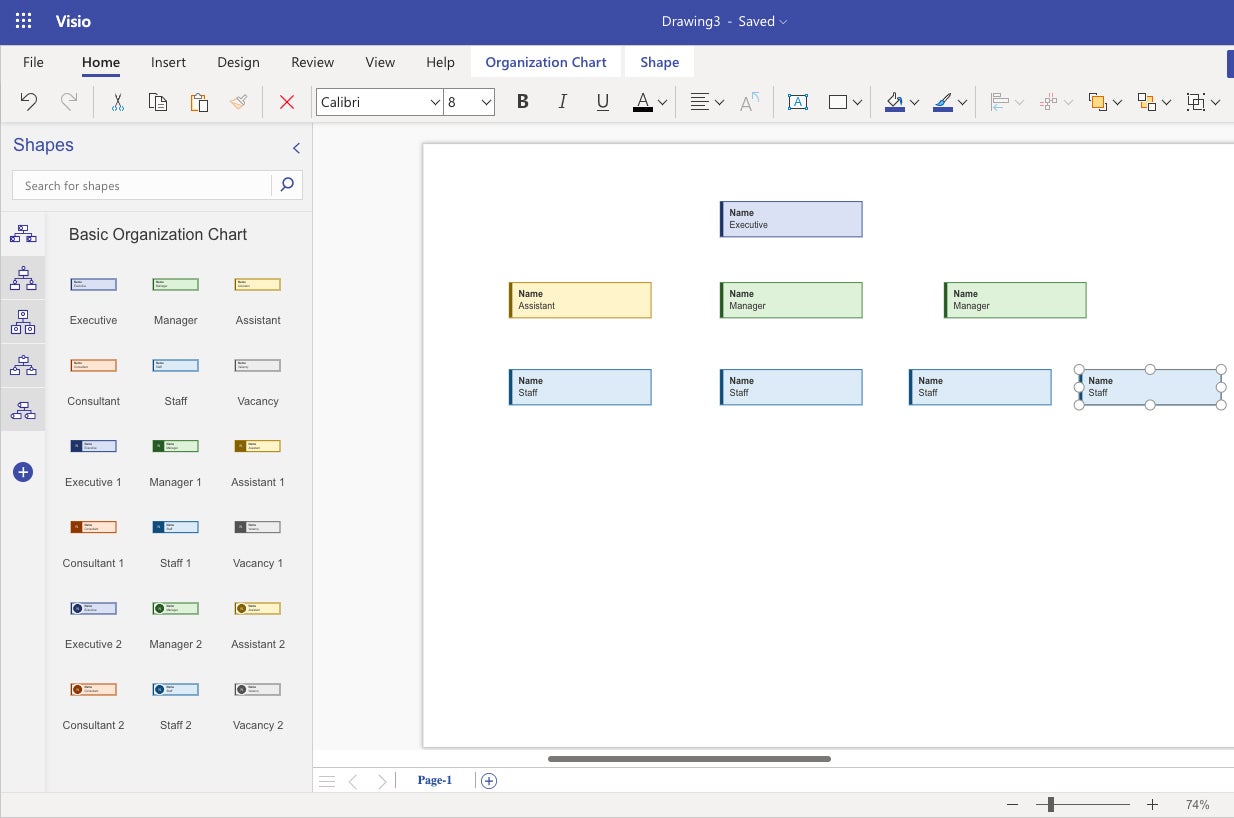
Developing an org chart is quite easy. As we did with the flowchart, drag and drop the pieces you wish to have — on this case, coloured rectangles comparable to paintings roles — from the left pane onto the principle canvas and get them organized in a hierarchical construction as proven under.
 Shimon Brathwaite/IDG
Drag and drop placeholders for the workers to your org chart. (Click on symbol to magnify it.)
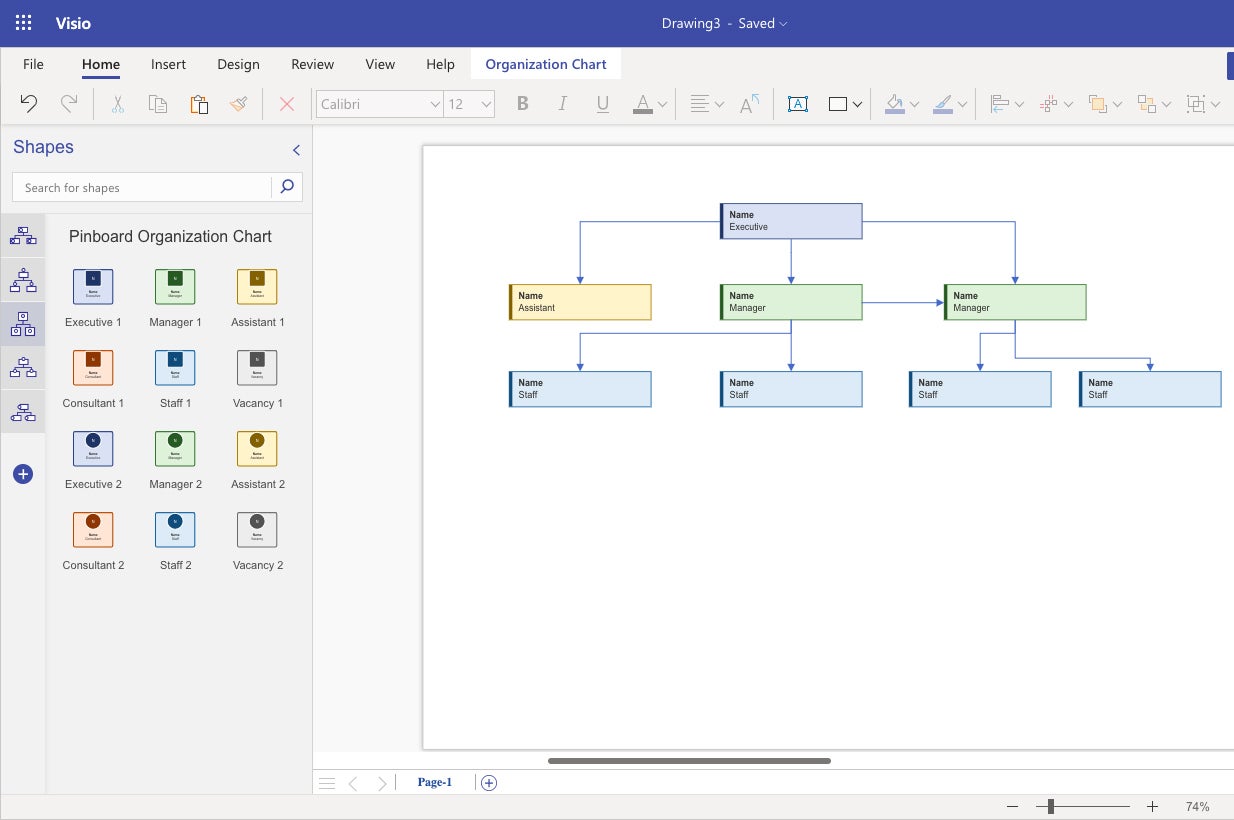
All that’s wanted after this is to attract the traces appearing the relationships between body of workers contributors. As with the flowchart, draw traces going from the higher-level body of workers to the lower-level body of workers.
 Shimon Brathwaite/IDG
Draw connector traces appearing the connection of staff to each other. (Click on symbol to magnify it.)
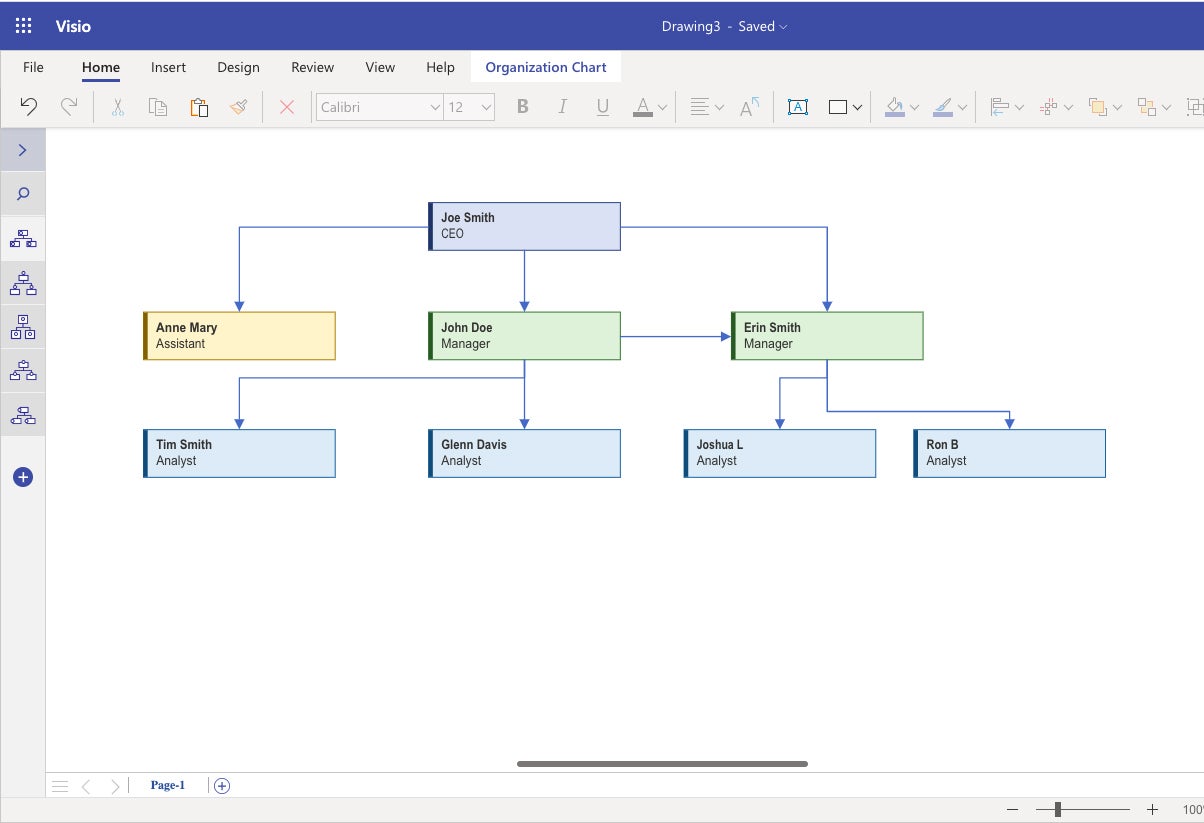
So as to add textual content to the containers, click on on every symbol, then regulate the title and identify of the body of workers member.
 Shimon Brathwaite/IDG
Fill within the staff’ names to finish the org chart. (Click on symbol to magnify it.)
The right way to create a diagram from scratch in Microsoft Visio
If there are not any templates that fit your precise wishes, it is very important create a diagram from scratch. Whilst we can’t wait for each motion you could wish to soak up making a customized diagram, listed below are the elemental steps for making a customized diagram.
To start out, from the Visio get started web page click on New clean drawing.
1. Make a selection and position your shapes.
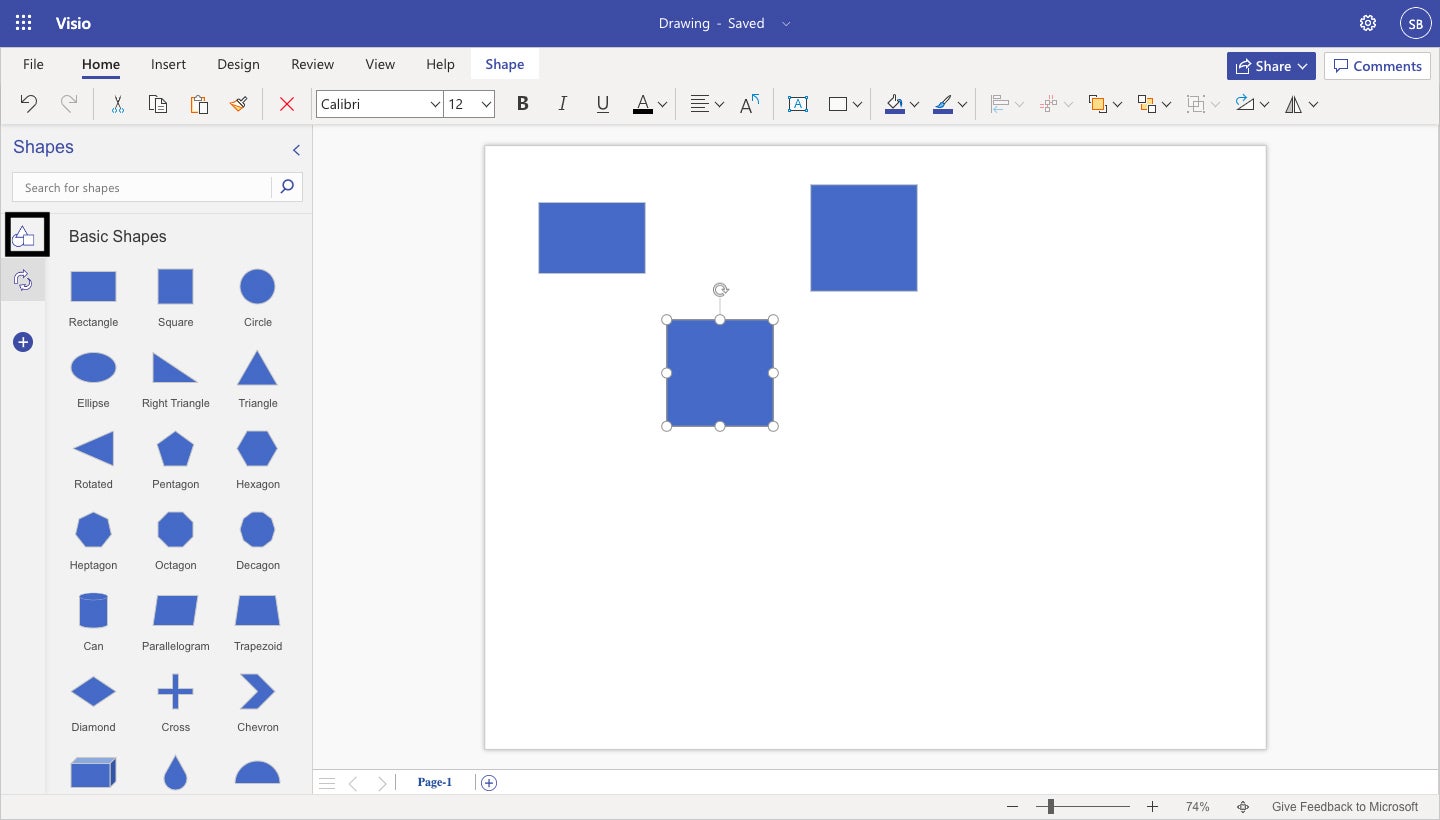
As when the use of a template, you’ll see the Shapes panel at the left facet of the display screen, with a clean canvas to the precise. The elemental development blocks of your diagram can be other shapes that you just use to constitute other pieces. Merely click on and drag your required form(s) onto the canvas.
 Shimon Brathwaite/IDG
Drag any shapes you wish to have to make use of for a diagram from the shapes panel onto the canvas. (Click on symbol to magnify it.)
You’ll transfer, resize, and upload textual content to shapes at the canvas simply as we did when the use of a template.
Along with the generic shapes that seem within the Shapes pane via default, you’ll be able to glance up customized icons that extra as it should be describe the ideas that you wish to have to put across. Click on the plus image on the left of the panel, and also you’ll be capable of flick through a couple of collections of shapes and icons that you’ll be able to pin in your panel, equivalent to Cycle Diagram Shapes, Industry Frameworks, and Interface Icons. (If truth be told, Visio templates are principally focused units of those form collections.)
You’ll additionally use the quest field on the best of the Shapes panel to seek for particular icons, as proven under.
Use the quest field to seek out extremely particular shapes or icons in your diagram. (Click on symbol to magnify it.)
2. Upload arrows
Subsequent, you want to make use of arrows as connectors to turn relationships between the shapes to your diagram. Those arrow photographs lend a hand other people to know the logical path that knowledge is flowing. For instance, in an org chart, you want to turn individuals who record to these inside the group. Click on the icon with two curved arrows on the left of the Shapes panel to peer the Arrow Shapes assortment.
Visio gives an array of arrow varieties you’ll be able to use to turn the development of your diagram. (Click on symbol to magnify it.)
3. Practice a theme
Issues may also be useful to make your diagrams extra visually interesting or to mirror corporate or consumer colour schemes. To choose a theme, merely move to the Design tab within the Ribbon, click on Issues, and make a choice the theme of your selection.
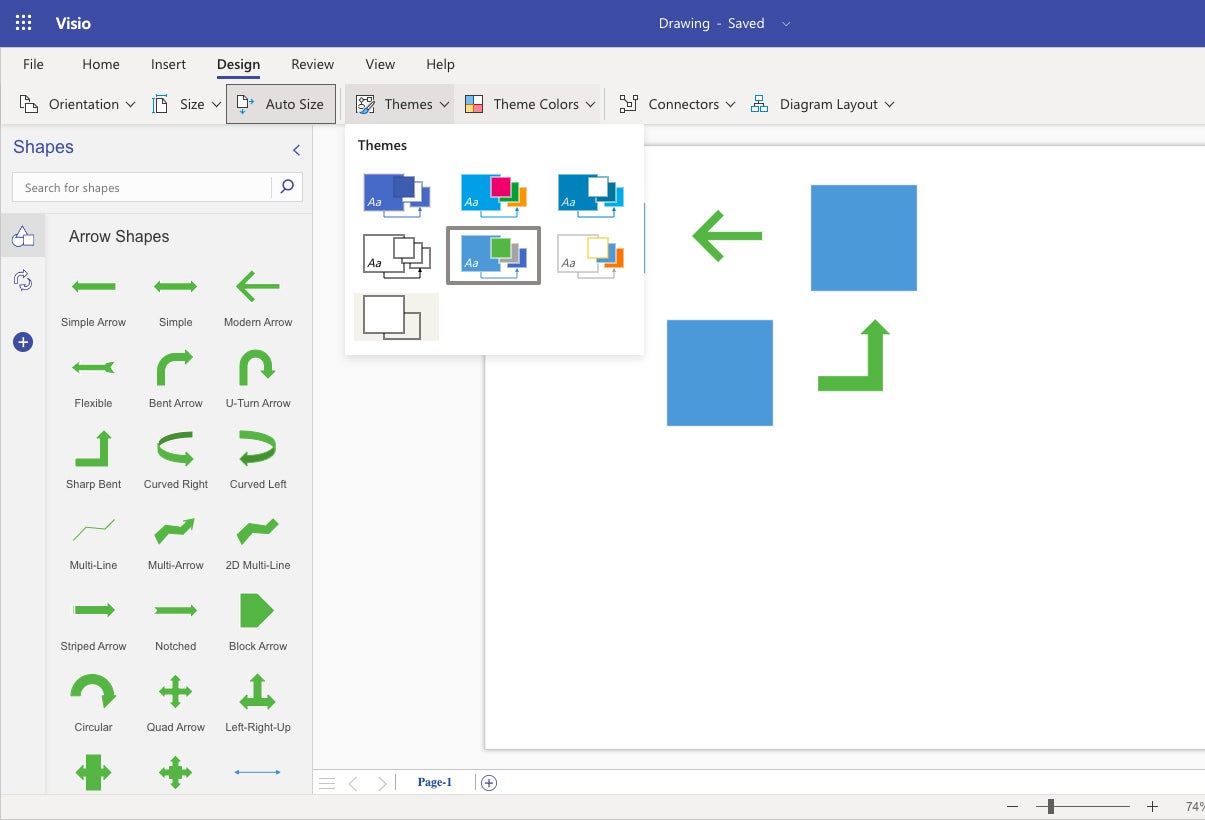 Shimon Brathwaite/IDG
Making use of a theme makes your diagram extra horny and more straightforward to absorb briefly. (Click on symbol to magnify it.)
The right way to save, open, and collaborate on Visio diagrams
As you’re operating on a diagram to your browser, Visio autosaves your paintings, calling it “Drawing” (or “Drawing2,” “Drawing3,” and so forth.) via default. To modify its report title to one thing extra significant, click on its title within the identify bar on the best of the display screen and sort in a brand new title.
While you return to the Visio get started web page, you’ll see all of the diagrams you’ve created (and that others have shared with you) in a listing on the backside of the web page. Click on any report title within the listing to open the diagram.
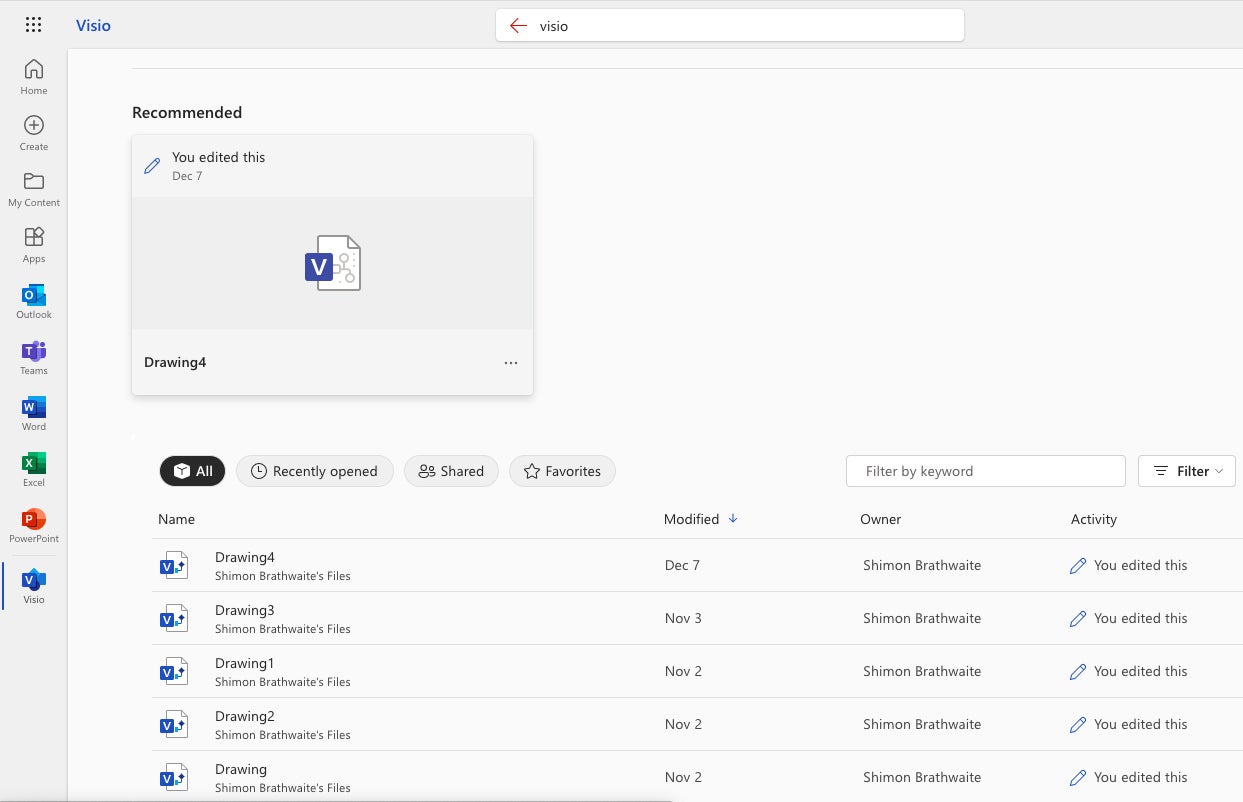 Shimon Brathwaite/IDG
Visio recordsdata you could have get right of entry to to are indexed at the Visio get started web page. (Click on symbol to magnify it.)
The diagram will open in a style that permits you to view and touch upon it, however no longer edit it. To modify to enhancing mode, make a choice Edit Diagram > Edit in Browser on the best proper of the display screen.
Like Phrase, PowerPoint, and different Microsoft 365 apps, Visio means that you can collaborate on diagrams with co-workers in actual time. Microsoft calls this “co-authoring.” To proportion a diagram, click on the Percentage button at best proper and make a choice Percentage from the menu that looks. The “Ship hyperlink” pane seems. Right here you’ll be able to kind in colleagues’ names or electronic mail addresses and an not obligatory message. Click on the pencil icon on the proper to select whether or not you wish to have to let the folks you’re inviting edit the diagram itself or just view and touch upon it. While you’re executed, click on Ship, and your invitees will obtain an electronic mail with a hyperlink the place they may be able to get right of entry to the diagram.
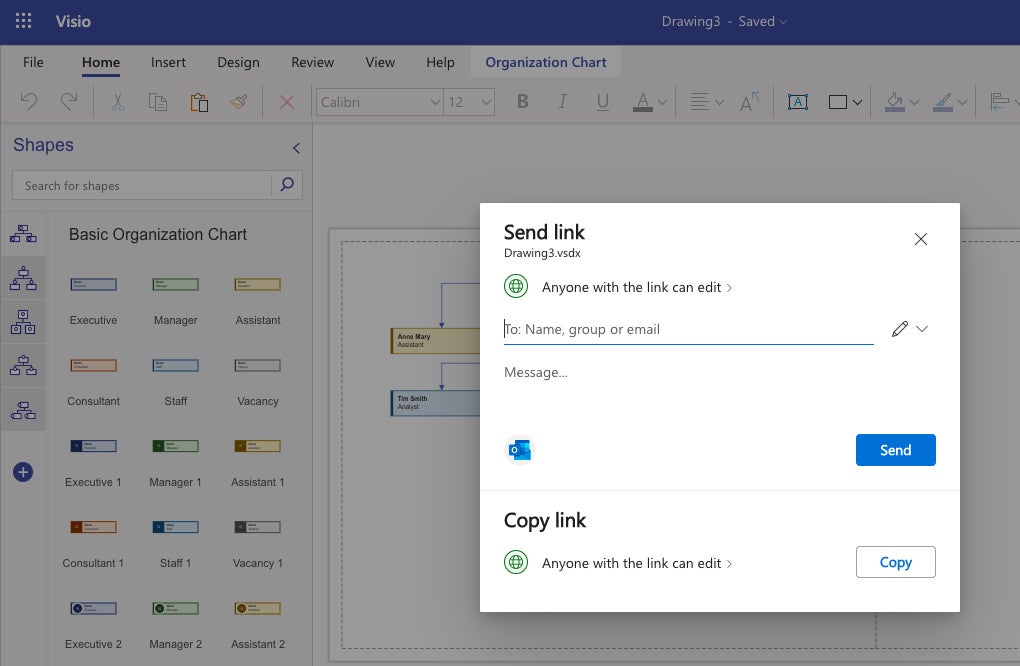 Shimon Brathwaite/IDG
You’ll invite colleagues to collaborate on a Visio diagram. (Click on symbol to magnify it.)
So as to add a remark to a diagram, click on the Feedback button on the best proper after which click on New within the pane that looks. To touch upon a particular merchandise within the diagram, click on its form after which click on the New button within the Feedback pane. Kind your remark within the remark field (you’ll be able to @point out any individual to name their consideration to it) after which click on the Put up remark button (a paper aircraft icon). Others can learn and answer in your feedback and/or upload their very own feedback.
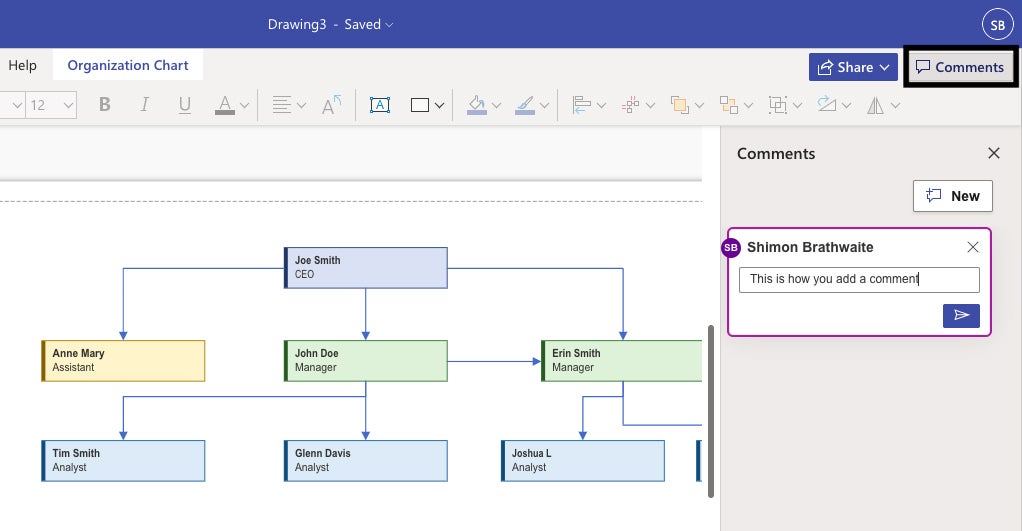 Shimon Brathwaite/IDG
Including a remark to a diagram. (Click on symbol to magnify it.)
Copyright © 2023 IDG Communications, Inc.